Introducing Uncial - A Native Markdown Reader and Editor for macOS
Introducing Uncial: rendered Quick Look previews and thumbnails for Markdown in Finder, an editor with Live Preview, three themes, diagrams and math, and no JavaScript from the files you open.
Introduction
TL;DR - I released a native macOS Markdown reader and editor called Uncial. Press Space on a .md file in Finder and you get the rendered document instead of raw text; open the file and you get a window with four editing modes, three themes, diagrams, math and syntax-colored code - and no JavaScript ever runs from the file you opened. Uncial is on GitHub - https://github.com/vflame6/uncial - and installs with Homebrew.
Most of what I write is Markdown: engagement notes, report drafts, tool READMEs, the posts on this blog. macOS treats all of it as plain text. Press Space on a .md file in Finder and you see the source with its # and | characters; double-click it and it opens in whatever last claimed the extension, which on my machine was Xcode.
The usual ways out are a Quick Look plugin from someone’s GitHub, an editor that ships a whole browser, or a notes app that wants to own the folder. I wanted something smaller: a native app that shows the rendered document the moment it opens, lets me edit in place, keeps up when Git or a sync client changes the file underneath, and does not execute anything from the file. So I wrote one.
What Uncial is
Uncial is a document app written in Swift with SwiftUI and AppKit. One Swift package turns Markdown into a self-contained HTML page. The app shows that page in a WKWebView; a Quick Look Preview Extension hands the same page to Finder; a Quick Look Thumbnail Extension draws the document’s outline as the file’s icon. Three build products, one rendering pipeline, so a file looks the same wherever you meet it.
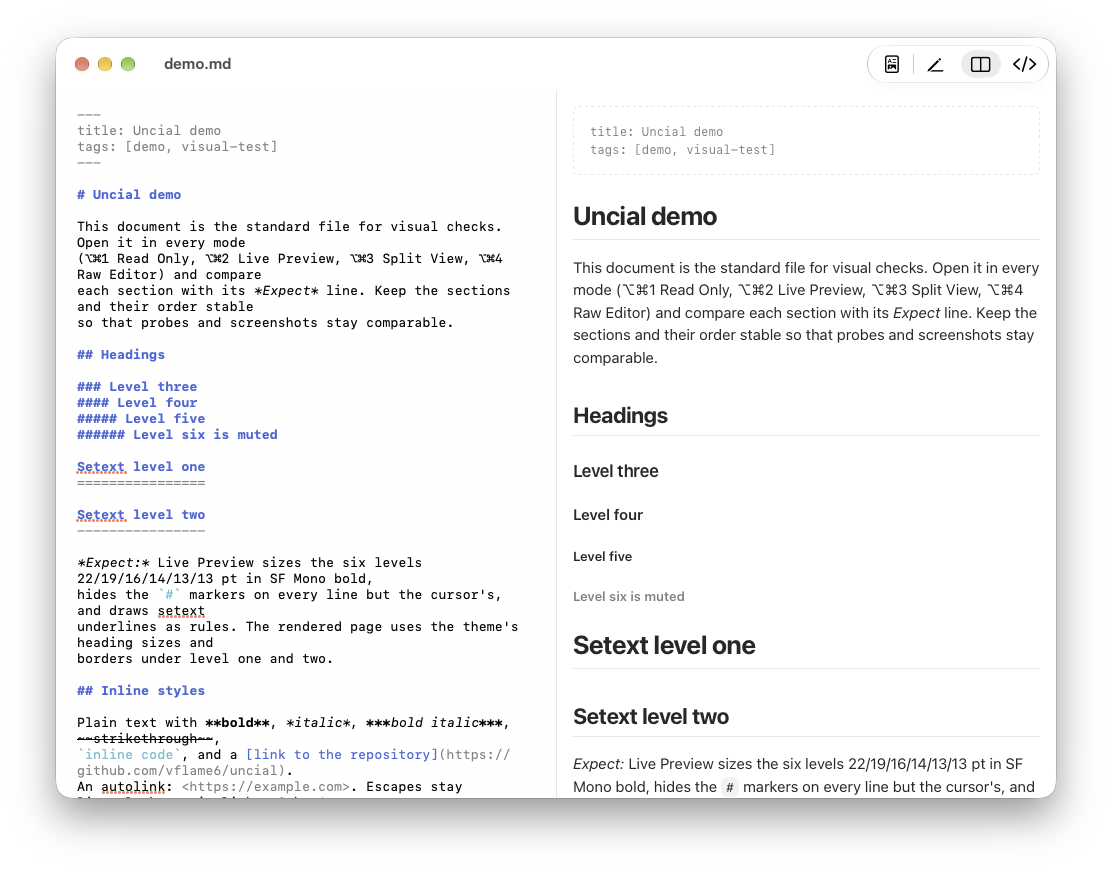
What you get:
- Rendered Quick Look previews and thumbnails for Markdown files in Finder.
- Four modes per window: Read Only, Live Preview, Split View and Raw Editor.
- GitHub-flavored Markdown plus LaTeX math, Mermaid diagrams, Obsidian-style callouts and syntax highlighting for about 50 languages.
- Three themes - macOS, GitHub and Solarized - each with a light and a dark variant.
- A Markdown-aware source editor: coloring, auto-closing pairs, list continuation, find and replace, line numbers, scroll sync.
- Saving on ⌘S or as you type, re-rendering when the file changes on disk, and a sane answer when both happen at once.
- Attachments found where you keep them, and pasted or dropped files copied there.
- Nothing loaded from the web unless you allow it.
It requires macOS 14 Sonoma or later and is MIT-licensed.
Reading
Quick Look and thumbnails
Select a Markdown file in Finder and press Space. The preview is the rendered document, in the theme you picked in the app: headings, tables, code with syntax colors, formulas, diagrams, callouts. The file’s icon becomes a small page drawn from the document’s outline - headings, paragraphs, list markers, quotes, code blocks, rules, tables - and that icon shows up in Finder, in Open panels and in Get Info. You can tell a report from a README from a checklist without opening any of them.
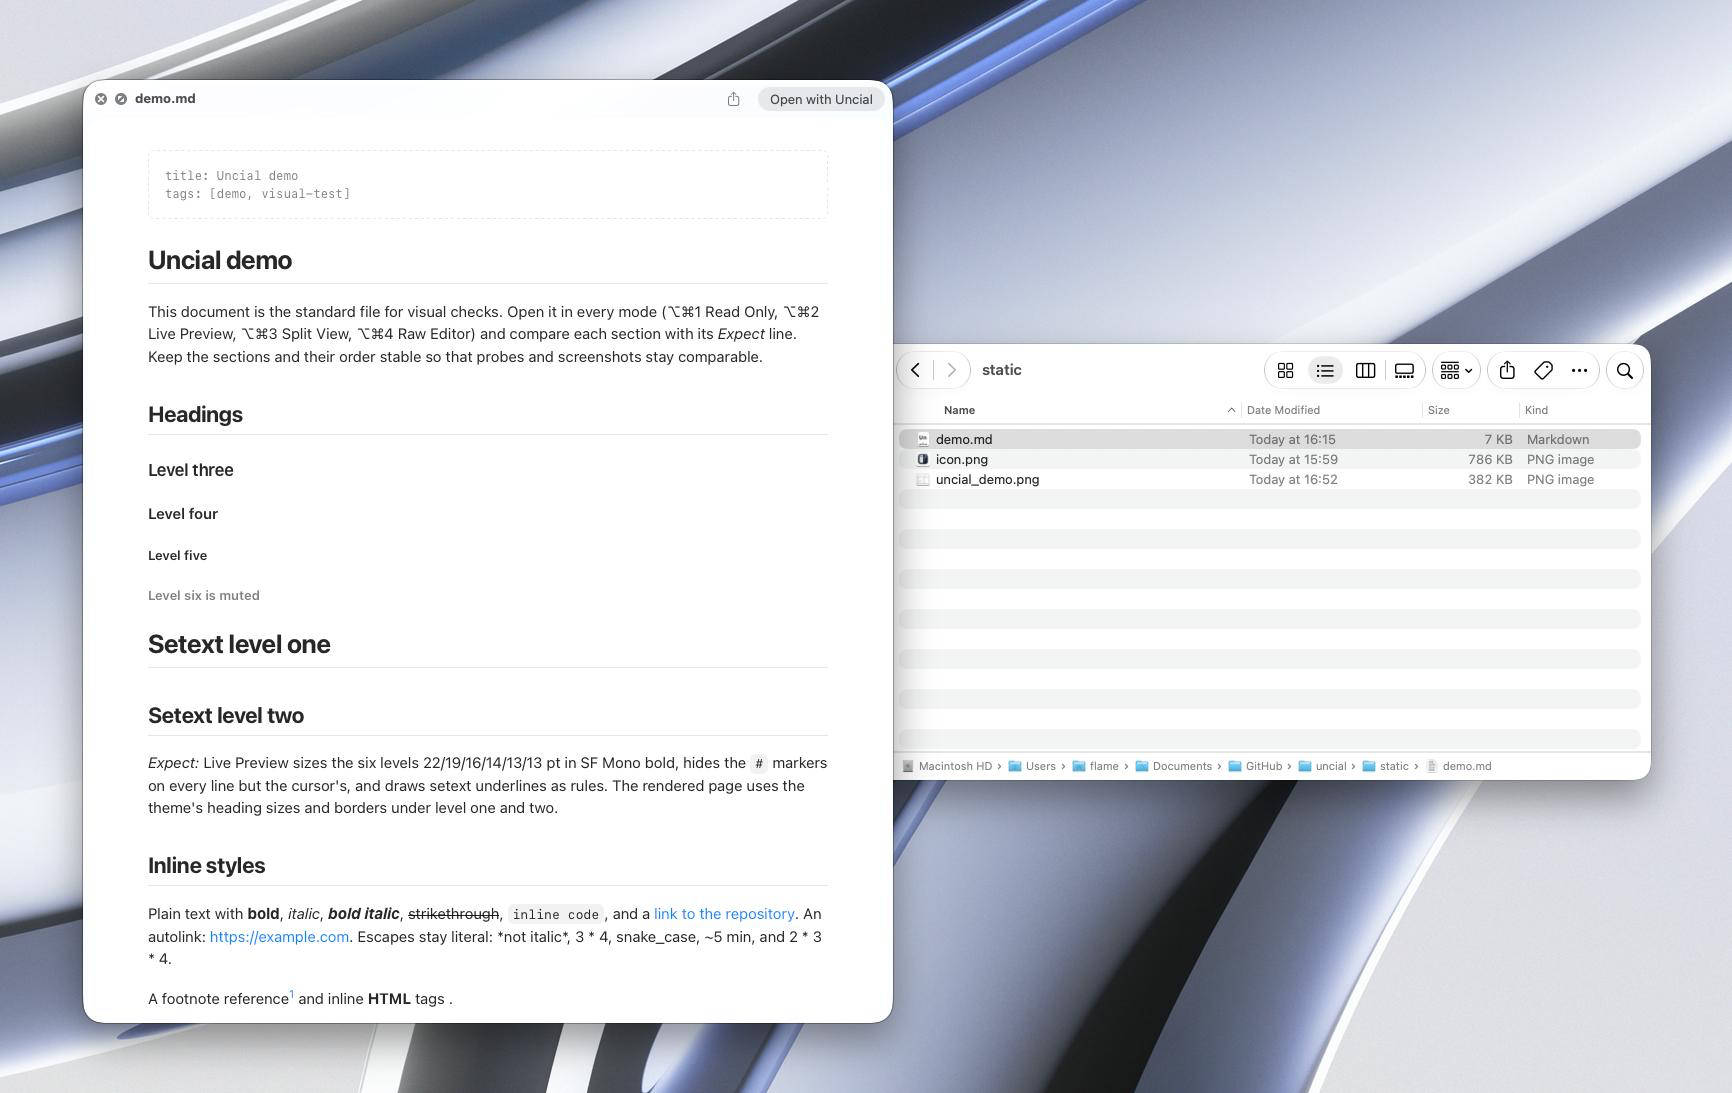 Space in Finder: the rendered document instead of the source
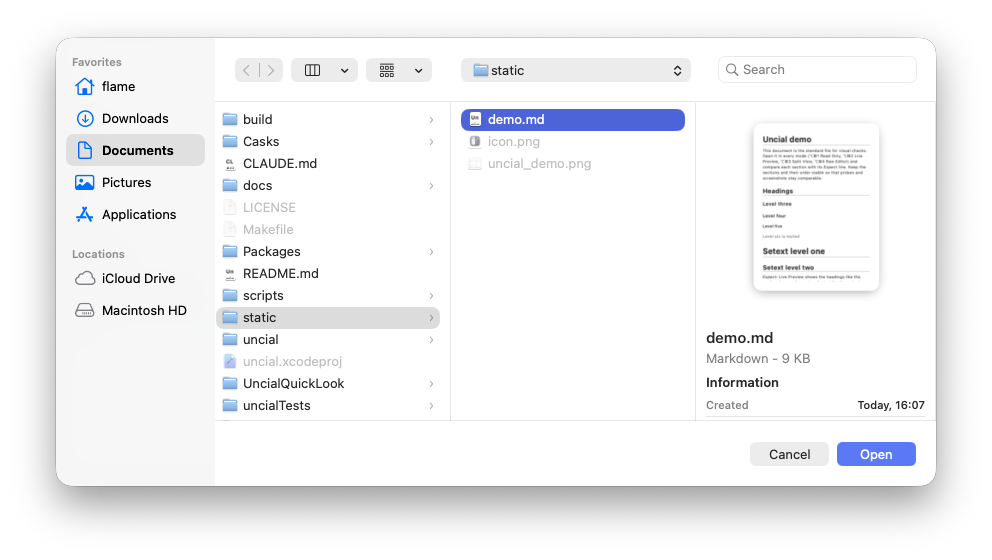 Each icon is the document’s outline
Both extensions are sandboxed. They read the file they were asked about and nothing else, which is also why a Quick Look preview shows no images: the sandbox denies the extension every sibling file, and I chose not to ship a temporary-exception entitlement to get around it. Open the file in Uncial and the images are there.
What gets rendered
The parser is cmark-gfm, GitHub’s own, with its extensions: tables, task lists, strikethrough, autolinks, footnotes and raw HTML. Headings get GitHub’s anchor ids, so [jump](#some-heading) links from a README work unchanged. YAML front matter is shown as a block at the top instead of leaking into the text.
On top of that:
- Code. Fenced blocks are highlighted with highlight.js grammars for about 50 languages - Python, JavaScript, TypeScript, Go, Rust, Swift, C, C++, C#, Java, Kotlin, Ruby, PHP, SQL, shell and PowerShell, down to Fortran, COBOL, Prolog and Pascal, plus JSON, YAML, HTML, CSS, diff, Dockerfile and Makefile. The colors follow the theme, and they are the same colors in the page, in Quick Look and in the editor.
- Math.
$…$,$$…$$and```mathfences go through KaTeX at render time and come out as MathML. There is no script in the page, so the formulas render in Quick Look as well. - Diagrams.
```mermaidfences become inline SVG in the theme’s colors. Flowcharts, sequence, state, class and ER diagrams and XY charts are drawn by beautiful-mermaid on every render; the rest (pie, gantt, mindmap, timeline, …) are drawn by mermaid.js in a hidden web view inside the app, once per appearance, and kept, so Quick Look shows them too once the app has rendered the file. - Callouts. A quote that starts with
[!note],[!tip],[!warning]or any other of Obsidian’s default types (aliases included) becomes a tinted box with the type’s icon and a title.[!type]-starts folded,[!type]+open. If your notes live in an Obsidian vault, they render the way you are used to.
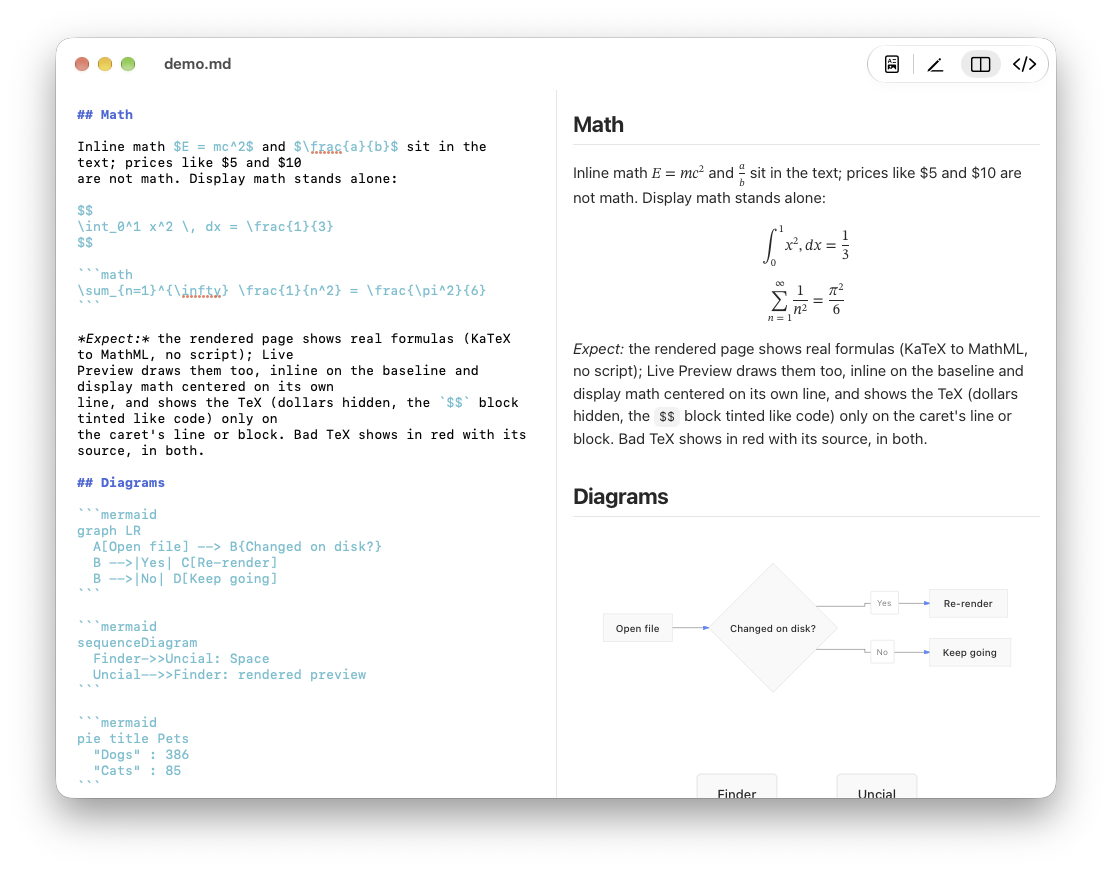 Callouts, Mermaid and KaTeX, no script in the page
Themes
Three themes, each with a light and a dark variant: macOS (the default: system colors and the system font, so the page follows the appearance live, like a native view), GitHub (the look you know from README pages) and Solarized. The editor’s colors, the syntax palette and the Quick Look preview follow the theme. Settings ▸ General also has an Appearance switch - System, Light or Dark - for the whole app.
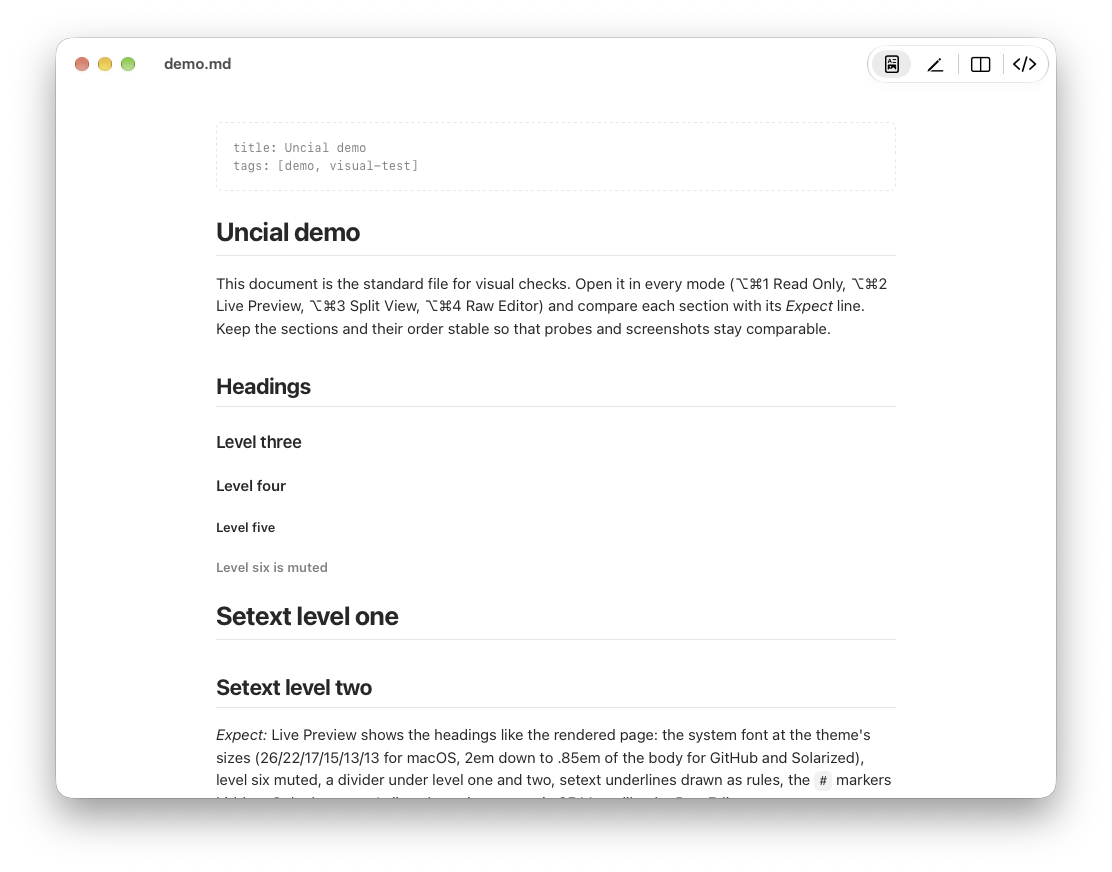
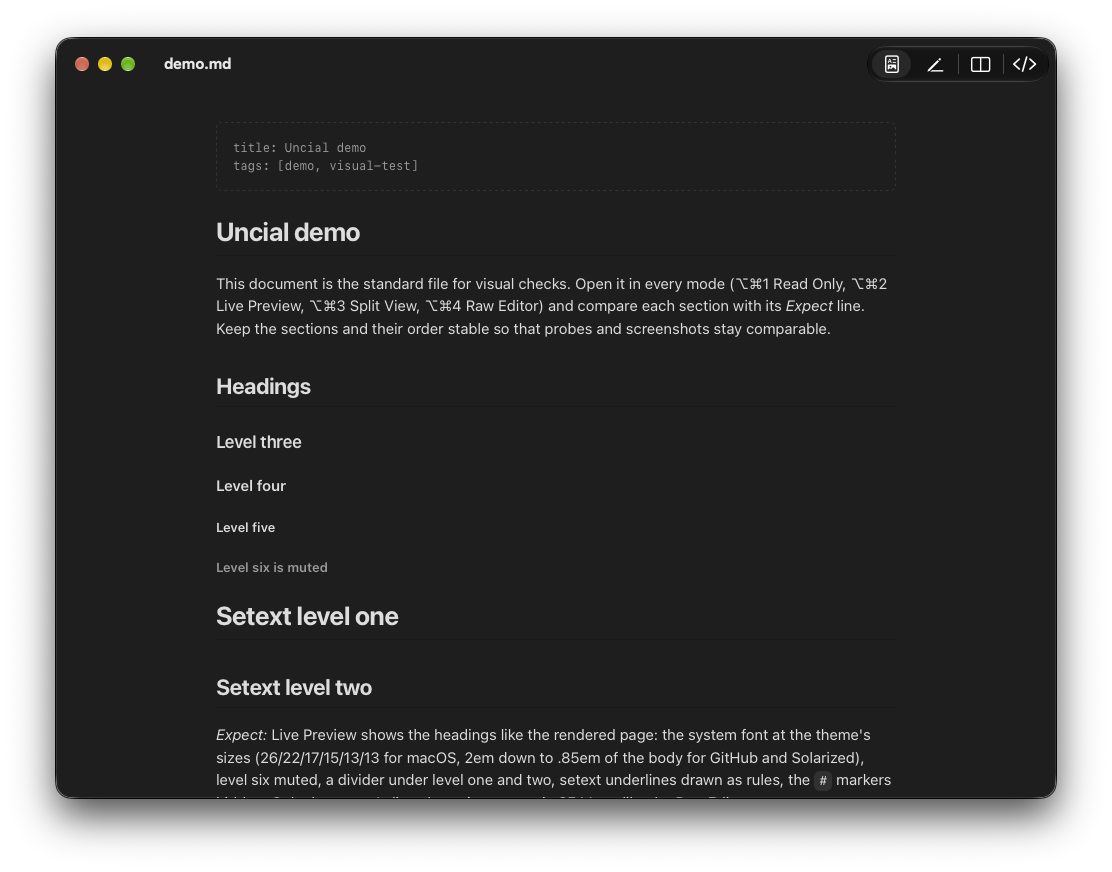 The same document in light and dark; switch this site’s theme to see the other
Editing
Four modes
Every window has a mode, picked from the segmented control in the toolbar, the View menu or the keyboard:
| Mode | Shows | Shortcut |
|---|---|---|
| Read Only | The rendered document | ⌥⌘1 |
| Live Preview | One editor with the Markdown rendered in place; the line with the cursor shows its source | ⌥⌘2 |
| Split View | Markdown source on the left, rendered document on the right, scrolled together | ⌥⌘3 |
| Raw Editor | Markdown source only | ⌥⌘4 |
⇧⌘E cycles through them. New windows open in the mode set in Settings ▸ Editor, Split View by default.
Live Preview
Live Preview is the mode I use most. The window holds one text view with the raw Markdown in it, but everything is drawn the way the rendered page draws it: headings in their sizes, bold and italic, inline code on a tint, links in the accent color, bullets, numbered lists, task boxes you can tick with a click, quotes with their bars, callouts with their icons, tables with aligned columns, images under their line, and diagrams and formulas as pictures. The line the cursor is on - or the whole fenced block or callout it is in - drops back to plain monospace source with every marker visible, and returns to the rendered look when the cursor leaves.
It is not a WYSIWYG editor with a hidden model underneath. The text is the Markdown, the file on disk is the Markdown, and what you see is attributes and glyph tricks on top of it. Undo, find, cut and paste all work on the source. ⌘-click follows a link; a plain click just places the cursor.
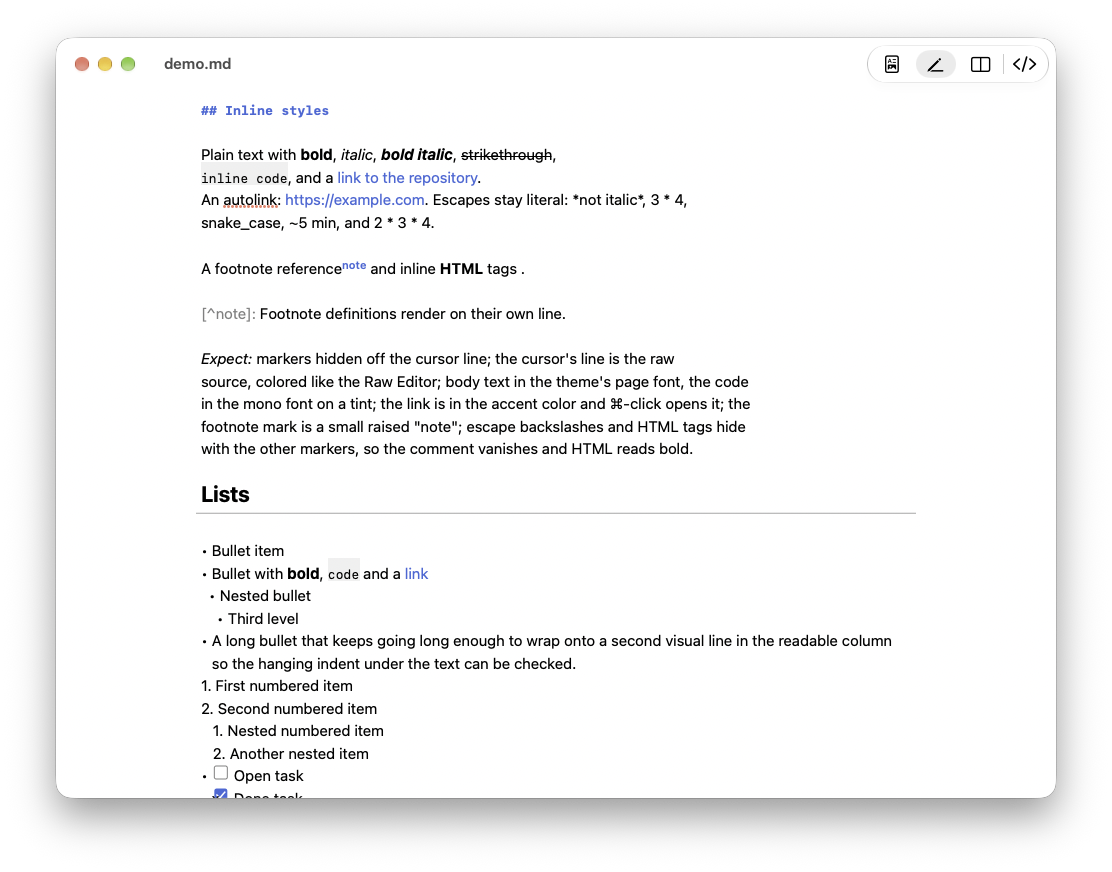 Everything rendered in place except the line under the cursor
The source editor
Whatever the mode, the editor is Markdown-aware: syntax coloring for every construct, fenced code included in its language’s colors; auto-closing of brackets, quotes and *, _ and ~ markers (**|** grows as you type, and Return between a pair of triple backticks opens a fence); continuation of lists, numbered lists, task lists and quotes on Return; find and replace (⌘F, ⌥⌘F); optional line numbers that also appear in the rendered page; an optional status bar with line, word and character counts; ⌘= / ⌘- / ⌘0 zoom; and a readable column in Live Preview instead of lines that run across a wide window. In Split View the source and the page scroll together, in both directions.
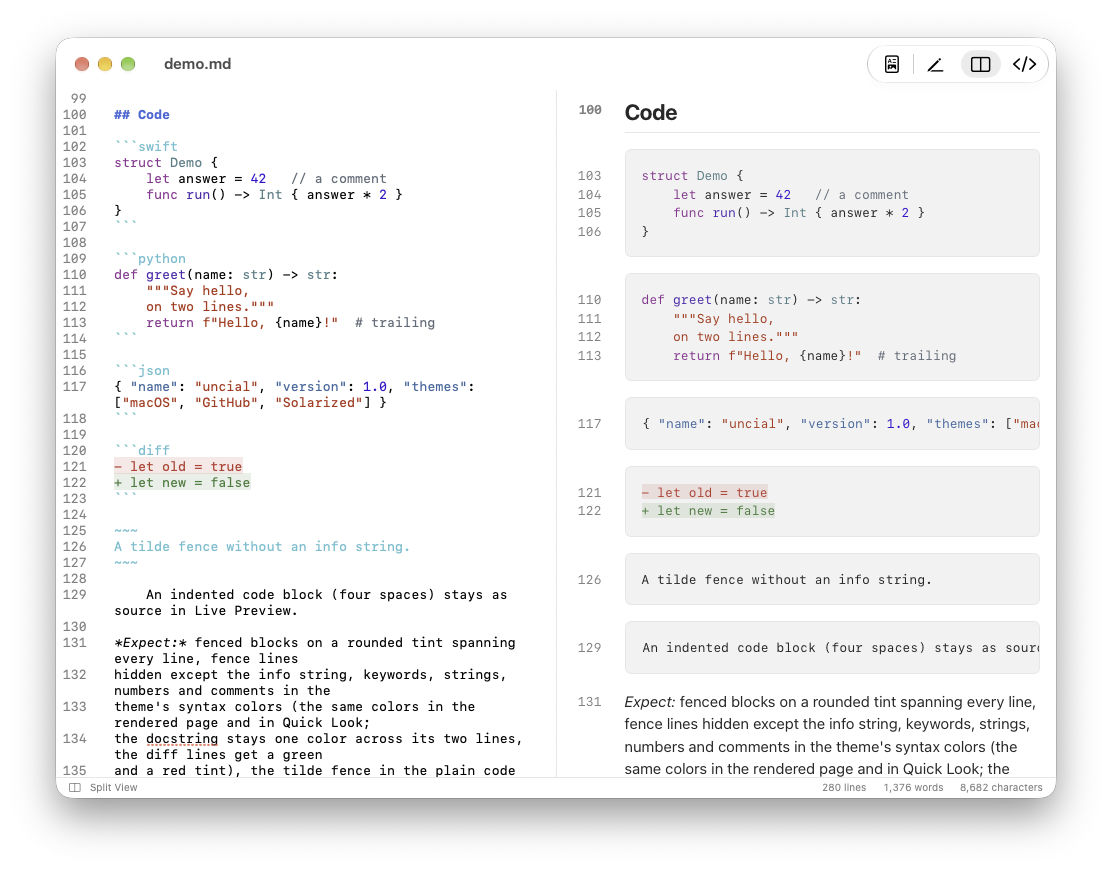 Split View: the panes scroll together
Saving, and files that change under you
Edits stay in the window until you press ⌘S. A window with unsaved changes shows the dot in its close button, and closing it, quitting or reloading asks first. If you would rather not think about it, Settings ▸ Editor has Save changes automatically, which writes the file half a second after you stop typing.
The file is watched while it is open. If Git, a sync client or another editor changes it and you have no unsaved edits, the window picks up the new contents and keeps its scroll position. If you do have unsaved edits, Uncial asks whether to keep them or reload the file (or does one or the other silently, if you set that in Settings ▸ Editor). Before every save it re-reads the file and runs the same check, so a change that landed between your last keystroke and the write is never overwritten blindly. git checkout in another terminal, rsync from a lab box, a sync client catching up - none of them lose a paragraph.
Attachments
A screenshot pasted into a note has to live somewhere, and every tool has its own opinion about where. Uncial looks in more than one place: if an image or linked file is not next to the document, it is looked for in the document’s attachments folder, then folder by folder above the document - each parent and its own attachments folder - up to your home folder or the root of the disk. The folder name, whether parents are searched and where the search stops are in Settings ▸ General, so a vault that keeps everything in _resources or assets works too.
The other direction works as well. Paste a picture or a file into the editor, or drop it from Finder, and Uncial copies it into the attachments folder (created as needed; Settings ▸ General chooses which one) and inserts the Markdown at the cursor:  for images, [name.ext](attachments/name.ext) for anything else. A pasted picture gets a timestamped name. A file the document already reaches - a note in the same folder, something in an attachments folder on the search path - is linked, not copied.
Markdown is untrusted input
This is a security blog, so here is the part I care about most. A Markdown file is an arbitrary document from an arbitrary source: a repository you cloned to review, a report a colleague sent, the README of a tool you are evaluating. Uncial treats it that way.
No JavaScript runs in the page. The app’s web view has content JavaScript disabled, and Quick Look never executes scripts in HTML previews. Raw HTML in the document goes through cmark’s tag filter, which escapes <script>, <iframe>, <style> and friends. The rendering does use JavaScript libraries - KaTeX, highlight.js, beautiful-mermaid - but they run in a JavaScriptCore context at render time, over the document’s text, and produce plain HTML, MathML and SVG. The page that reaches WebKit contains no script at all. (mermaid.js, for the diagram types beautiful-mermaid lacks, runs in a hidden web view inside the app at its strict security level and never touches the page you read.)
Nothing is loaded from the web unless you say so. An <img src="https://…"> in a README is a tracking pixel whether or not anyone meant it as one, and a canary token dressed as a badge is the same thing with a webhook. By default Uncial leaves every remote reference unloaded - images and srcset, video, audio, iframes, embeds, <link>, url() in style attributes, <meta http-equiv="refresh"> - in the window, in Live Preview and in Quick Look. It is enforced three times over: the renderer rewrites the references before the HTML exists, the web view carries a content rule list that blocks http, https, ftp and ws loads outright, and the editor’s own image loader is gated by the same setting. Links still work when you click them, because following one is your decision. If you want badges and remote images, Settings ▸ General ▸ Privacy has the switch.
The extensions are sandboxed; the app is not. The Quick Look preview and thumbnail extensions run in the App Sandbox and can read only the file they are previewing. The app runs without the sandbox on purpose: a sandboxed document viewer gets access to the opened file alone, and relative images next to it would never load. Both are signed with the hardened runtime, and the app and its extensions share one App Group container for the theme, the remote-content setting and the pre-drawn diagrams, nothing else.
Under the hood
For the people who read source before README:
UncialCoreis a Swift package with no AppKit in it. The pipeline is front matter → cmark-gfm → callouts → heading anchors → KaTeX → beautiful-mermaid → highlight.js → image inlining → the remote-content pass → one HTML page with the theme’s CSS inlined. The JavaScript libraries are bundled as package resources and run in JavaScriptCore behind a lock; nothing is fetched at run time.- The app is a SwiftUI
DocumentGroupin viewing mode. It owns the write path itself, because NSDocument’s autosave model fights “the file on disk is the truth”. The page lives in aWKWebViewwhose body is swapped in place 150 ms after the last keystroke, so the scroll position survives. The editor is anNSTextViewon TextKit 1; Live Preview is attributes and glyph properties on the raw text, not a second model. - The extensions are a data-based
QLPreviewProviderthat returns the same HTML, and aQLThumbnailProviderthat walks the cmark tree into an outline and draws it with AppKit.
Installation
Uncial ships as a Homebrew cask from a tap served by the repository itself:
1
2
3
brew tap vflame6/uncial https://github.com/vflame6/uncial
brew trust vflame6/uncial
brew install --cask --no-quarantine uncial
Homebrew 7 wants third-party taps trusted explicitly before it runs their cask code; the second line does that. --no-quarantine skips the Gatekeeper prompt described below; drop it if you prefer to allow the app by hand. The zip is also on the Releases page as Uncial-<version>.zip.
Building needs Xcode 26:
1
2
3
git clone https://github.com/vflame6/uncial.git
cd uncial
make install
make install builds a Release Uncial.app, copies it to /Applications, launches it once so macOS registers the Quick Look extensions, and clears the Quick Look cache. Or open uncial.xcodeproj, pick the uncial scheme and run.
Uncial is signed with a development certificate and is not notarized - there is no Developer ID behind it yet. Without
--no-quarantine, macOS blocks the first launch: open System Settings ▸ Privacy & Security, find the message about Uncial and click Open Anyway.
First launch
The first launch shows a Welcome window with the General settings: appearance and theme, an Install button for the Quick Look extensions, and a Make Default button that makes Uncial the default app for Markdown files (it remembers the previous handler and puts it back on Remove). Everything in it is in Settings (⌘,) later.
Enabling the Quick Look extensions
- Select any
.mdfile in Finder and press Space. You should see the rendered document, and the file’s icon should show a small page of it. - If you still see plain text, open System Settings ▸ General ▸ Login Items & Extensions ▸ Quick Look and enable Uncial Quick Look (previews) and Uncial Thumbnails (icons and Open panels). On macOS 14 the switches are under Privacy & Security ▸ Extensions ▸ Quick Look.
Reset Quick Look if needed; the cache reset also throws away old thumbnails:
1
qlmanage -r && qlmanage -r cache
Only one Quick Look extension can preview a file type, and one can draw its thumbnails. If another Markdown previewer is installed - QLMarkdown, Peek, Marked - disable it in the same pane, or macOS may keep using it.
Opening files
Right-click a Markdown file ▸ Open With ▸ Uncial, drop it on the Dock icon, or:
1
open -a Uncial README.md
Uncial and its extensions handle .md and .markdown, and also .mdown, .mkd, .mkdn, .mkdown, .mdwn, .mdtxt and .mdtext. File ▸ Open (⌘O) and Open Recent work as in any document app; File ▸ New… (⌘N) asks where to create an empty file and opens it; View ▸ Reload (⌘R) re-reads the file if you ever need to force it.
Shortcuts worth knowing
| Shortcut | Does |
|---|---|
| ⌥⌘1 / ⌥⌘2 / ⌥⌘3 / ⌥⌘4 | Read Only / Live Preview / Split View / Raw Editor |
| ⇧⌘E | Cycle the modes |
| ⌘S | Save |
| ⌘R | Reload from disk |
| ⌘F / ⌥⌘F | Find / Find and Replace (in Read Only, the rendered page is searched) |
| ⌘= / ⌘- / ⌘0 | Zoom in / zoom out / actual size |
| ⌘N / ⌘O | New file / Open |
| ⌘, | Settings |
The full list is in Settings ▸ Shortcuts.
Known limits
- Quick Look previews show no images or attachments; the sandbox lets the extension read only the previewed file.
- The app is not notarized and not on the App Store, so the first launch needs the Gatekeeper step above, or
--no-quarantine. - macOS 14 Sonoma is the floor.
Conclusion
Uncial is on GitHub - github.com/vflame6/uncial - under the MIT license. The repository ships static/demo.md, a document that exercises every construct the app renders, one section each with a note on what to expect; open it in the four modes and you have seen the whole feature set in five minutes.
If something does not render the way any other application renders it, or you have an idea, open an issue. Bug reports and pull requests are welcome.
Thank you for reading, I hope it was useful for you ❤️
Resources
- https://github.com/vflame6/uncial
- https://github.com/vflame6/uncial/releases
- https://github.com/github/cmark-gfm
- https://katex.org
- https://highlightjs.org
- https://www.npmjs.com/package/beautiful-mermaid
- https://mermaid.js.org
- https://help.obsidian.md/callouts
- https://developer.apple.com/documentation/quicklook